Do you want to start working out or do you want to get back in shape again? But you do not know where to start? This article gives you the answer: start training your core! You might have heard from the term ‘core’, but what does it mean exactly? Your core is the center of your body which exist of your back, abdomen and pelvis. In this article, you can read more about the benefits of training your core and which exercises are suited to achieve a well trained core!
Why should I start training my core?
The core is the center of your body and without this core you would not be able to get anywhere. The muscles of the core help you to perform everyday tasks such as lifting groceries or lifting a child. In fact, it is involved in every move you can think of.
In the gym, you also use your core for running, boxing and weight training. If your core muscles are well trained, you will be able to control your muscles and you are able to maintain your balance as well. When the muscles of your core are well trained, the chances of getting injuries will reduce and it can also reduce existing problems or injuries drastically. For these reasons it is important to train the muscles of the core well.
How do I achieve this?
You should realize that it takes time to achieve well developed core muscles, so it is important to take small steps. Your core exist of 29 muscles, it will therefore take some time to get there. It is important that you work on a better balance and on your strength. Try doing a bicep exercise while standing on one leg. Is this a challenge for you? No problem! Take your time to master the core exercises. Below you can read more exercises that help you develop a solid and well-trained core.
Core exercises
With the right exercises you can train your entire core in a good way and you also deal with and / or prevent existing back complaints. Read more about the right exercises below.
Planking
In this exercise you train your entire body with the focus on the abdominal muscles (both straight and oblique abdominal muscles) and the lower back muscles. Very easy to perform in the gym or at home!
The Superman
A simple exercise that is good for many muscle groups. In particular, you will feel the small and large buttocks and hamstring while performing this exercise. Just lie down on the floor, exhale and extend your right arm and your left leg. Then go back to the starting position. Now it is time to exhale again and stretch the other leg and arm out.
Squats
The leg exercise that consists of countless variations. With this exercise you train a large part of your body, and you also work on your coordination, balance, flexibility and posture! During the squat you use multiple muscle groups in one movement. You train your leg muscles (hamstring, gluteal muscles, calves and quadriceps), your back muscles and abdominal muscles. Make sure that your knees do not pass your toes during squatting and your upper body is still upright.
NiceDay: Do you want to train or do you want to improve your core muscles? Then plan an activity in NiceDay and write down in your diary how it was for you to train your core. What went well and what could have gone better?
Backaches are a common problem that affect around 75% of the adult population. That is not that strange, because our backs carry us around and most of us don’t take good care of it. Dropping temperatures are luring us insight to the couch. Practitioners and physiotherapists don’t find it surprising anymore that they see an increase in back problems during this time of the year. That’s why we are gonna walk you through some steps and tips that can help you to get rid of those backaches.
Step 1: Find the cause
There are often multiple causes that aren’t that easy to find and contribute to your backaches. The most common ones are: overload, tension, bad posture (both sitting and standing) and lack of movement. Especially a physiotherapist can help you find the cause.
Step 2: Take action
People have the tendency to stop moving when experiencing backaches. Inform your practitioner or a physiotherapist to see what kind of movement you CAN do. There are many different back- and abdominal exercises that relieve your back.
Step 3: Write down goals
Writing down goals can help you to specify what you want to work on. Make sure these goals are achievable so you don’t overload yourself. Think of something that you want to be able to do again but you stopped doing because of the backaches. For example, start with a ten minute walk or cycle and build this up.
Step 4: Identify your body posture
Most people don’t pay a lot of attention to this although it is all too common. Standing up, sitting down or lifting things is often done in the wrong posture. This can lead to injuries and an overloaded back.
Step 5: Get plenty of sleep
Sleeping is essential for the relief of tension in the muscles and recovery. Especially your back needs rest to recover.
It is also important to take into account a few things that can help to relieve your back. These simple and practical tips can help you:
- Make a straight back when you lift, also use your core muscles to support your back when lifting things.
- Never turn your back when lifting things
- Train your core with abdominal- and back exercises
- Avoid high heels, these shoes don’t support your body weight and are often very unstable
- Get yourself a good office chair for work that is adjustable and gives you good back support
- Do you have a mattress that takes your spinal cord into account? If you experience backaches, then is this something that can help you a lot.
- When carrying things, hold the things close to the body to relieve the strain on your back
The new year is about to begin and a lot of people want to start the new year with exercising. This is also why a lot of gyms get new subscriptions of motivated people with new year’s resolutions. But why do people suddenly want to exercise more when the new year has arrived?
The month of December
Is it because of all the food we eat during the festivities in December? Do we want to get rid of the extra kilos we gained? Or is it just because of the ‘new start, new me’? Anyway, people seem to be motivated to work out again in the new year. And that is definitely not a bad thing! But why only then?
Hold on!
Unfortunately, most of the people will work out only for a couple of weeks and after these first few weeks they stop. That is too bad, because the most difficult period is already behind you. In the beginning you still have to build muscles and up your fitness level. But when you train regularly, exercising should get a little easier. Still, a lot of people stop after a while. But why? Ask yourself the following questions: what can help me to stay motivated? Does working out get boring? Do I need more variation? Think out-of-the-box!
Furthermore, having a goal can also be motivating. However, make sure that it is an achievable goal. Realise that you are doing this for yourself, and for your own body. It is for a good cause and that will give you the motivation.
How to stay motivated
Of course it is way easier to say: ‘’find the right motivation and set achievable goals’’, then to actually stay motivated. But with the right tricks, you’ll be able to stay motivated! For example, if you are going to exercise, do it always on the same time. This will make sure it is going to be a ‘habit’. A habit is something that has become natural for you, because of this it will cost you less effort.
Furthermore, it is important to write down your pitfalls. You learn from them! If your pitfall is that you want to see immediate results, ask yourself: is this achievable? Think by yourself: what is achievable? If you find it difficult to answer this question you can ask help from people who know more about it. For example a personal sports coach!
NiceDay app
Plan a workout in your Daily Planner in the NiceDay app and describe how you feel before and after working out.
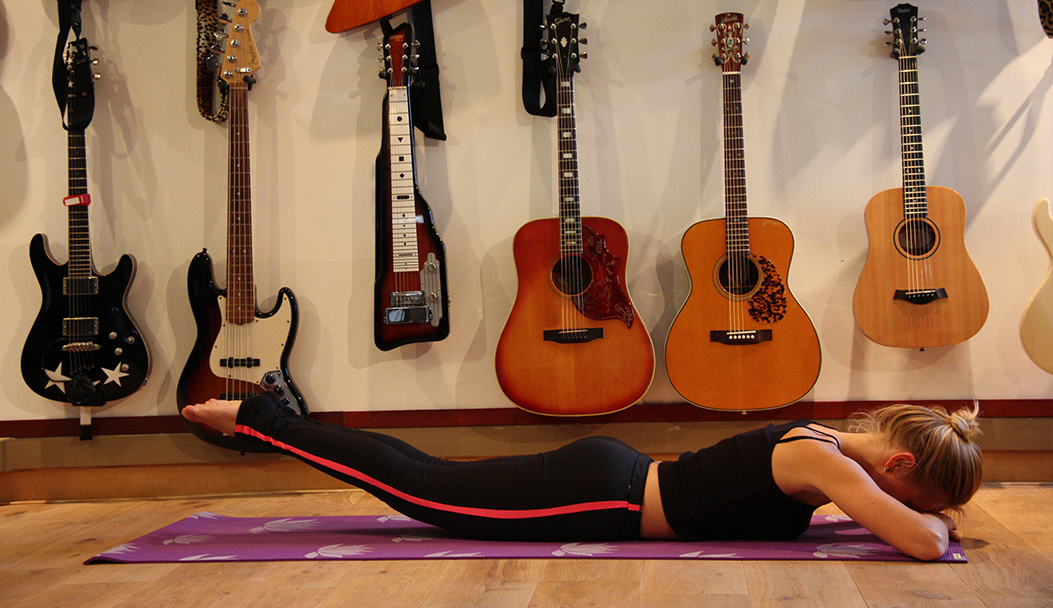
The back muscles are one of the largest muscle groups the body has. Training this muscle group not only ensures a better posture, it also prevents injuries in the back, neck and shoulders during a sedentary occupation. In the yoga pose the Grasshopper the back muscles are optimally trained. In this blog post an explanation about this asana.
What is the Grasshopper?
This is a basic pose; a symmetrical backward bend. In yoga jargon this asana is called “Salabhasana”. Salabha means grasshopper. In this pose, the arms and legs are removed from the ground and the body rests on the stomach. In addition to the back muscles, the large buttock muscles, hamstrings and calf muscles are also trained. The upper body, especially the triceps and shoulder muscles, are also activated.
What is the effect of the Grasshopper?
In this asana it is the intention to stretch the arms and legs completely. That can be a challenge because gravity gives resistance. When the legs are raised, they automatically turn outwards. By tightening the hamstrings the legs stay turned in which requires extra effort from the body. The higher the arms get off the ground, the more that is felt in the shoulders and neck. To counteract the pressure, the shoulders often pull towards the ears. The goal is to stretch the arms as far as possible and to keep the shoulders away from the ears. When the arms and legs are off the ground, the body rests on the stomach. The body can rock back and forth while inhaling and exhaling. The challenge is not to swing but to let the belly rest completely on the ground. The pressure on the stomach has a positive effect on the metabolism and massages the internal organs. In order to be able to stay in the pose and keep the arms and legs off the ground, it requires effort from the back muscles. The higher the arms and legs, the harder the back muscles have to work and the more intensive this asana will be.
How you do the Grasshopper
In order to be able to do the Grasshopper properly, the Cat posture is a good warm up exercise. This pose increases the flexibility of the back. After this posture, you put the body on the mat, arms stretched out in front of you, legs on hip width and chin on the mat to support the head. On an inhalation you bring the arms, head and legs off the ground. Make the arms and legs as long as possible and let the chin lightly point towards your chest so that there is no tension in the neck and shoulders. Tighten the hamstrings to keep the legs in the right position, push the shoulders away from the ears and hold the pose for a number of breaths.
Alternatives
When it does not feel good for the (lower) back, neck or shoulders, these alternatives can help:
- Keep the arms and legs less high. It is not about getting it as far away from the mat as possible, it is about feeling how far your back can handle it and respecting that boundary.
- With a lot of tension on the (lower) back, neck and / or shoulders it can be nice to put the hands in front of you on the mat, put your hand together and let the forehead rest on the hands. And only keep the legs up.
- The legs are at hip width apart. An alternative to this can be to push them against each other, so you have more control and do the pose more easily.
We already know that exercise is healthy. However, we consider strength training as something we do to get stronger and look good. You might not know that it also has a lot of health benefits! Let us walk you through some of the benefits.
Fat loss and strength training
Research shows that obese adults who do strength training lose more weight than those who do not, also a bigger part of the weightloss is fat (Beavers et al, 2017). It sounds a little off, since you do not burn that many kilocalories by doing strength training. However, since your body uses a lot of oxygen during the training, you will keep on burning kilocalories after the training too. So even when you are all cozied up on the couch while watching Netflix! Next to that, strength training will allow your muscles to grow. This will also cause fat loss, because muscles burn more kilocalories than fat. So in other words: compared to cardio training, strength training causes you to burn fewer kilocalories during your training; but you burn more kilocalories in moments of rest.
Depression and strength training
Of course, strength training is no magic pill. But it can help prevent and reduce symptoms of depression. Exercise in general has a positive effect on you mental well-being, since it affects your hormone household. We explain more about this subject in this blog post. However, strength training specificly seems to have an even bigger effect. Research shows that depressed people who do strength training experience less complaints.
Reducing back pain
Strength training is probably the last on your list when you suffer from back pain. However, research shows that strength training can reduce back pain significantly (Jackson, Shepard & Kell, 2011). This might be because you develop body stability and because it gives you the opportunity to slowly build intensity.
A healthy heart
Up until recently people believed that strength training might not be the best idea for cardiac patients. But the contrary has been shown: cardiac patients who do strength training perform better in cardio training because of the increased amount of muscle mass and the quality of life increases (Gezondheidsnet, 2016). It also affects the blood pressure in a positive way. The blood pressure will increase during the training, but after the training it well reduce slowly. This is also the case for people with a healthy blood pressure.
The effects on your sugars
Your body gets more sensitive for insulin as a result of strength training. Or in other words: your body uses the produced insulin more efficiently. This is because muscle is the most (insulin-) sensitive tissue in your body, increasing your muscle mass means increasing the total body insulin sensitivity. And this means you can process glucose more easily. This can help prevent or reduce diabetes type 2.
Self confidence
How great does it feel when you are able to open that can of peas by yourself and you can carry that heavy bag of groceries without help? You are totally independent! Next to that, your body will change and your muscles are starting to show. This does not only mean that you will feel better, but also your posture will improve! A good posture will give your self confidence a boost (Brinol, Petty & Wagner, 2009).
NiceDay app
Plan a training in your Daily Planner on the NiceDay app. Describe how you feel after the training. The next time you don’t feel like training, you can look back at this message and remember how good you feel afterwards!
Looking at this picture you might think “No, this pose can’t be good for me, I’m not flexible enough”. Logical, most people think that when they see the Plow pose. And yet everyone can do this pose when you gradually build up for it. The basis for this pose is in the preparatory poses. The warmer the body, the more flexible the muscles and joints, the easier the Plow is. In addition, there are all kinds of variations that allow you to do the Plow with more ease (and fun). These tips will help you.
What is the Plow posture?
This is a basic pose; an inverted supine position and forward bend. In yoga jargon this pose is called “Halasana”. Hala means “Plow”. There are many variations in this asana, although some may be pretty risky. The starting point is always doing what feels right; respect the body and the limits it indicates. In this pose, the (lower) back muscles, hamstrings, calf muscles, scholar muscle (just above the ankle), the triceps and the monk’s cap muscle (shoulder muscle) are stretched intensively. Stretching of the body is good because it brings back the natural length and suppleness of the body and the bloodstream and metabolism are stimulated. In the picture I have entwined my hands and stretched arms. Alternatively, the arms can also be stretched with the palms of the hands flat on the ground. When the toes do not touch the ground and the pressure on the lower back feels too much, it is best to put the hands on the lower back with elbows on the ground for support.
What is the effect of the Plow?
Halasana is a good pose to increase flexibility in the back muscles and hamstrings. In addition, it also has a positive effect on the muscles in your neck and shoulders and ensure that any tension that is there is reduced. The biggest challenge in this asana is being able to breathe freely. As a result of the reverse over bend, more pressure is placed on the diaphragm and organs, which reduces the freedom to breathe deeper. It is a matter of feeling how far you can bring your feet back to breathe freely. The goal is not that your toes touch the ground, that comes naturally with time. The focus is on the back and on breathing freely. To be able to do the Plow a good warm-up is required. That is why you will encounter this pose in a yoga class half way or towards the end of the class.
These tips help to do the Plow with more ease:
Tip 1 Preparation
Good preparation is important. Doing sun salutations several times makes the body, muscles and joints ready for this posture. Do at least 10 sun salutations when you do not do any other preparation poses. In yoga jargon we never say that we ‘do an pose’ but say we ‘come into the posture’. To get into the Plow, the (supporting) Shoulder stand and Bridge are nice preparation poses, where the second one gives the most challenge.
Tip 2 From the Shoulder position
If your toes do not touch the ground in the Plow, the Shoulder pose is the best position to start from. In this asana you have your hands on the lower back for support. On the exhale the toes point towards the face and the legs go straight and slowly forward. Try to keep the back straight as long as possible and first focus on the hamstrings. When you feel that you have reached your max, you hold your pose there. Remain a number of breaths in the pose. When the feet do touch the ground, gently stretch out the arms and place the palms on the floor. Feel the difference. If it feels comfortable, bring your hands together, intertwine the fingers and stretch the arms as far as possible while resting your hands on the floor. Bring the chin towards the chest to decrease pressure in the neck.
Tip 3 From the Bridge
In Halasana coming from the Bridge is more challenging and requires more of your arm muscles, especially the triceps. When you are in Bridge, the arms are stretched, fingers intertwined and the hands rest on the floor. You bring your body weight on one leg, for example the left. At the inhalation you stretch the right leg up and let it fall backwards, at the same time you push your arms against the ground. When the right toes are on the ground, let the left leg follows. Now also bring the chin to the chest to decrease pressure in the neck.
Actually, this yoga pose is not difficult to do, but it is difficult to perform well and to keep it going. In order to get and maintain the body in a straight line, concentration and control of breathing is necessary. Very easily you can stretch too far, or keep the hips too high or too low, reducing the effect of this pose. These tips will help you do the sideways plank correctly and with more ease.
What is the sideways plank?
This is a basic posture: a balance exercise on one arm. In yoga jargon this pose is called “Vasisthasana”. Vasistha means a sage; the best; the richest, the excellent. This asana is also called the ‘Attitude of the wise Visistha’. The biggest challenge in this pose is gravity, mental focus and maintaining a neutral axis of the spine. Due to the lateral posture, the muscles work against gravity. This requires effort from muscles and joints to stay in position.
What are the effects of the sideways plank?
This asana is an active basic posture and requires not only concentration of breathing, but also effort of the arms, stomach, chest, back, shoulder and leg muscles, and also of the hip and wrist joints and the vertebral column. In order to remain stable, the effort of many muscle groups is necessary and proper breathing is required. Good breathing (quietly breathing towards the belly) helps to maintain the pose for longer and is only possible when the body is and stays in a straight line. All muscles mentioned are trained in this pose which makes them stronger and gives an improved body posture and increases the overall condition.
This is how you do the sideways plank
Vasisthasana can be done by starting from the ‘standard plank’ pose. The weight is on two arms, fingers spread on the mat, and the legs on hip width apart. You then let the heels fall from the foot to the left, so that the sides of the feet are on the mat. When you do this, all the weight automatically will shift to the left arm. Make sure that you do not ‘hang’ in your shoulder, but stretch the arm well and keep the shoulder away from the ear. On a next inhalation, raise your right arm and on the exhale you extend this arm upwards. You make a straight line with the whole body and hold this pose by breathing at ease. Then you bring the right foot on the left foot and push the legs together. To get a straight line, push the tailbone towards the feet so that you automatically bring the hips forward. Stay in the pose for a number of breaths before you change sides. First back in the standard plank pose and then you shift the weight on the right arm.
When the wrists and/or lower back are soft spots these alternatives can help you do the sideways plank with more ease:
Alternative for the wrists
Instead of putting the hand flat on the mat, you make a fist. This takes the pressure off the wrist.
Alternative for the back
When two legs on top of each other doesn’t feel good, you can keep the feet apart and place them on the mat. Or if you have the weight on the left arm, place the left knee on the mat. By doing this, the pressure on the (lower) back reduces.
When you practice this asana for the first time, the muscles can start to vibrate. That is a sign of effort. Concentrate on breathing to maintain in this pose and relax the muscles.
Exercising has a positive effect on your health. You feel more energetic and maintain your weight more easily. But, do you also ensure a sufficient food intake to improve your sports performance? Many people underestimate the effect of nutrition on their sports performance, health and weight. Did you know that if you’re exercising to achieve a certain weight or muscle mass, nutrition has a bigger effect than sports?
Drink sufficiently
Firstly, think of your water intake: if you’re doing sports, your body loses a lot of water. If you lose 2% of water weight, your sports performance may already decrease by 25%. Most athletes don’t need to drink sport drinks: only if you train longer than one hour, you may consider it. Rather drink water while exercising: 150 ml per 15 minutes, or for very heavy sport sessions: 500ml per 30 minutes. As an athlete, you can easily drink 2 to 2.5 liters of water daily.
Carbohydrates are good
In addition, it is useful to eat enough carbohydrates. Do not underestimate this: carbohydrates are necessary for the release of energy and for building muscle. A higher muscle mass means more fat burn, even during rest. Avoid carbohydrates from soft drinks, snacks, fruit juice and white bread. You get more energy from brown pasta, bread and rice, fruit, vegetables and beans or chickpeas. If you prefer to eat white rice or pasta before exercising, be sure to add enough vegetables to have the energy for your sports session.
Recover with food
In addition, your body also needs food after your workout. Most important are the proteins, from beans, chickpeas, meat, fish, vegetables, nuts, dairy and eggs. Many athletes overestimate the amount of protein they need. Try to eat 1 to 1.5 grams of proteins per kilogram of body weight. The most important period to eat enough proteins is in the 48 hours after a sports session. Try to divide your protein intake over your meals during that period. Especially in the evening a small meal with some proteins works beneficial for the recovery of your body.
NiceDay app
If you make small adjustments in your food intake and try to drink enough, you will notice that you have more fun in sports and improve! Note what your sports goals are in the diary of the NiceDay app, for example 5 kg of weight loss, running 10 km, touching your feet, et cetera. Also note how your sessions go and what you’ve achieved already. This gives you a nice overview of the progress you make.
When you can’t do push-ups, the Cobra is a good yoga pose to build strength in the arm muscles. In addition to the arm muscles, the back muscles, large buttock muscles and hamstrings are also trained in this pose. In this blog I’ll share more about the effects of the Cobra.
What is the Cobra?
This is a basic posture: bending backwards from a prone position. In yoga jargon this posture is called “Bhujangasana”. Bhujanga means snake. Bhuja stands for arm or shoulder and ang stands for limb. In the Cobra the focus is on the spine, arms and legs. Many think that the legs are passive in this position but especially the hamstrings can be active just like the big gluteal muscle.
What is the effect of the Cobra?
By raising the upper body, the entire group of the dorsal back muscles and the abdominal muscles are active. This movement ensures that these muscles get stronger, which reduces, among other things, low back pain. The triceps, biceps and large and small pectoral muscles in the arms are especially trained. By regularly doing the Cobra, strength in the arms increases. Because the upper body goes up, the hamstrings automatically stretch. When they feel stiff or aren’t trained, the Cobra can be a challenge for the leg muscles. The big buttock muscle will automatically activate when this pose is a challenge for the hamstrings to help the body to stay in position.
That’s how you do the Cobra
Lie on your stomach and place your forehead on the mat. The hands come under the shoulders and the arms against the body. At an inhalation the hands push the body upwards, the arms stay slightly bent and against the body. The chest is pushed forward and chin up. Because the upper body goes up, the glutes and hamstrings tighten. Use this tension by pushing the hips towards the ground and thereby increasing the intensity of the asana. Although it is customary to raise the body on the inhalation, it can sometimes feel better to do this on the exhale. This depends on the breathing at that moment whether it is high (at the chest) or low (at the abdomen). Do what feels most comfortable for you to get the most out of this pose.
Alternatives
Does it hurt your (lower) back, shoulder or arms? These alternatives help you to do the Cobra with more ease.
(lower) Back
How higher the upper body is pushed up, the more pressure comes on the (lower) back and on the back muscles. The goal is not to bring the upper body as high as possible but at a height that feels good to you. Strength increases automatically and so does the ease of doing this pose.
Shoulders
With stiff shoulder and / or neck muscles, it may be nice not to put the hands under the shoulders but further apart or slightly forward. It can certainly help to pull the shoulder blades together to remove tension at the shoulders and neck.
Arms (and wrists)
In this position, the arms remain close to the body. When that doesn’t feel good, it is fine to have the elbows pointing outwards, which reduces the pressure on the arm muscles. If the wrists are sensitive, it can help to make fists with the hands and rest on them.
When you practice this pose for the first time, the muscles can (slightly) tremble. That is a sign of effort. Concentrate on your breathing to hold on to this pose and build up strength in the arms.
If you look at the photo, you might think that you are going to break your neck in this yoga pose. But nothing is further from the truth: everyone can do the Headstand. And when you do this asana regularly, it offers many health benefits. Scientific research shows that doing a reversed posture such as the Headstand increases brain activity by 14%. Just like the ability to concentrate better and in addition, it slows down the aging process. But how exactly does that work? In this blog post I will explain the effects of the Headstand and I will include a step-by-step guide on how you can do this pose with ease.
What is the Headstand?
This is a pose for advanced students: a reversed posture with arm support. In yoga jargon this pose is called “Salamba Shirshasana”. Shirshasana stands for ‘head’ and Salamba for ‘support by arm’. Often this asana is only called Shirshasana. In order to raise the body, the buttocks, thigh-, arm- and abdominal muscles are particularly active. Falling over can definitely happen in this pose. When doing this pose, make sure you do it on a soft surface or a wall to which you can rest against.
What are the effects of the Headstand?
This asana has many advantages when you do it regularly. Because the body is reversed, the blood pressure in your head, neck, shoulders, veins, blood vessels, lungs and legs also changes. The muscles and tissues in the body are activated to be able to stay in the posture. There is more oxygen in your head, which causes 14% more brain activity. This improves focus and prevents depression and anxiety. In addition, a reversed pose has a positive effect on the aging process of the body. It improves the overall body posture and especially strengthens the muscles in the back, shoulders, arms and abdomen. The Headstand also has a positive effect on the immune system and naturally enhances digestion. In short, this asana had a long list of health benefits.
This is how you do the Headstand
It is best to start from the Child pose. Remain a few breaths in this asana, until the body feels completely relaxed. Then put your hands on the mat and place the top of the head on the mat. It is important to place the hands well at a 90 degree angle where the fingers point towards the face and the fingers are spread for more grip. Stretch the legs and place the toes onto the mat. When you do this, there is automatically more pressure on the head and neck. Give yourself a few breaths to get used to this feeling. When you are ready, bring the knees to the chest one by one and the feet come off the ground. Stay in this position for a moment, check your breathing and then stretch out the legs at ease. Tighten the abdominal and buttocks muscles to remain more stable.
Alternatives
When the abdominal muscles are not trained enough, it can be difficult to bring the knees towards the chest. Alternatively, you can first let the knees rest on the forearms one by one. Left knee on left forearm, right knee on right forearm. Only when it feels stable and you have your breathing under control, you can first stretch one leg and then the next leg. When the Child Posture does not feel comfortable to do, an alternative is somersaulting before doing the Headstand.
The most important thing in the Headstand is doing what feels good for your body. Respect the limits that the body indicates and do not go over it. And as for so many things: if you practice regularly, it’s will get easier every single time.