If you look at the picture, you might think “No, I can never do this!” But nothing is further from the truth. By finding the right balance between the muscles and joints, everybody can succeed in this pose. And to be able to do that, precision is needed; bring your full attention to the pose. In this blog I will tell you more about the effect of the Crane pose and how you can do the pose with ease.
What is the Crane pose?
This is an advanced arm balance pose. In yoga jargon this pose is called “Bakasana”. Baka means crane. In this asana, the vertebrae, legs and arms are used in particular. In order to be able to make the bend with the back, the small lumbar muscle, the abdominal muscles and the pelvic floor are active. The neck muscles are also active to keep the neck stretched. The lumbar and hip muscles flex the hip joints and the hamstrings ensure that the knee flexion is maintained. In particular, the triceps work against gravity to remain in this asana. And also the muscles in the hand ensure that the bow of the hand can be maintained. In short, there are many muscles and joints simultaneously active in the Crane. The big challenge is not so much in the strength of the muscles as in finding enough focus to keep balance.
What is the effect of the Crane pose?
This asana mainly has a stretching effect on the body and specifically on the dorsal back muscles, neck muscles and the monkshap muscle. Regularly doing this asana reduces back pain, relaxes the hip joint and strengthens the triceps. By training these areas, it also improves the overall body posture. In order to remain in this pose, proper control of breathing plays a role. Because the thoracic part remains bent, respiratory movements in the rib cage are limited. Because the hip joint is tilted, breathing to the lower abdomen is difficult. When you breathe to the lower abdomen, you are more likely to lose stability. The upper part of the belly is free for breathing.
This is how you do the Crane pose
To do this asana it is good to start with the child pose as a warm-up. Then place your hands on the mat, in front of the body while squatting. Let the knees fall out. By having your hands flat on the mat and spreading the fingers, you will automatically be more stable. Slowly bring the weight forward on the hands and see how it feels. Then press your knees against your elbows. The elbows touches the inner part of your leg, against the knee. Bring your weight a little more forward and let your toes still rest on the mat. Bring the attention to your breathing and slowly lean forward and take the feet off the mat one by one.
Alternatives
In the crane the knees are placed against the triceps. On the picture you can see that I am not doing that. I pressed the legs against the elbows. This is a good alternative for when it doesn’t feel good to place the knees higher. It also makes it easier to experience what it takes to be able to balance in the Crane. Another alternative is to leave the feet (both or one) on the mat so that the muscles and joints have time to get used to the pose. When the body is stiff, this pose is a nice one to loosen it up. The more you practice it, the easier it becomes.
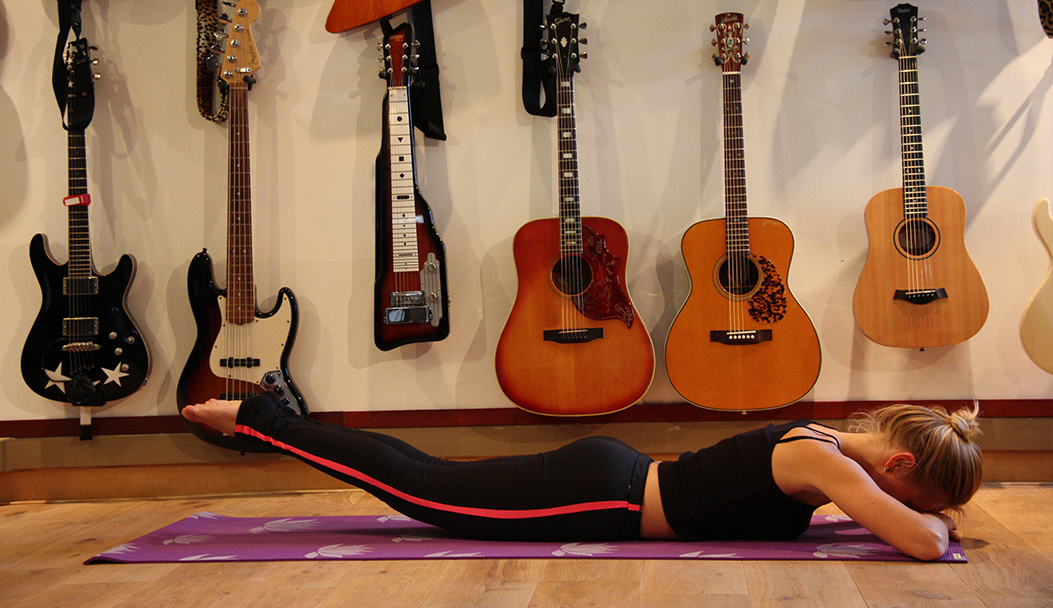
The back muscles are one of the largest muscle groups the body has. Training this muscle group not only ensures a better posture, it also prevents injuries in the back, neck and shoulders during a sedentary occupation. In the yoga pose the Grasshopper the back muscles are optimally trained. In this blog post an explanation about this asana.
What is the Grasshopper?
This is a basic pose; a symmetrical backward bend. In yoga jargon this asana is called “Salabhasana”. Salabha means grasshopper. In this pose, the arms and legs are removed from the ground and the body rests on the stomach. In addition to the back muscles, the large buttock muscles, hamstrings and calf muscles are also trained. The upper body, especially the triceps and shoulder muscles, are also activated.
What is the effect of the Grasshopper?
In this asana it is the intention to stretch the arms and legs completely. That can be a challenge because gravity gives resistance. When the legs are raised, they automatically turn outwards. By tightening the hamstrings the legs stay turned in which requires extra effort from the body. The higher the arms get off the ground, the more that is felt in the shoulders and neck. To counteract the pressure, the shoulders often pull towards the ears. The goal is to stretch the arms as far as possible and to keep the shoulders away from the ears. When the arms and legs are off the ground, the body rests on the stomach. The body can rock back and forth while inhaling and exhaling. The challenge is not to swing but to let the belly rest completely on the ground. The pressure on the stomach has a positive effect on the metabolism and massages the internal organs. In order to be able to stay in the pose and keep the arms and legs off the ground, it requires effort from the back muscles. The higher the arms and legs, the harder the back muscles have to work and the more intensive this asana will be.
How you do the Grasshopper
In order to be able to do the Grasshopper properly, the Cat posture is a good warm up exercise. This pose increases the flexibility of the back. After this posture, you put the body on the mat, arms stretched out in front of you, legs on hip width and chin on the mat to support the head. On an inhalation you bring the arms, head and legs off the ground. Make the arms and legs as long as possible and let the chin lightly point towards your chest so that there is no tension in the neck and shoulders. Tighten the hamstrings to keep the legs in the right position, push the shoulders away from the ears and hold the pose for a number of breaths.
Alternatives
When it does not feel good for the (lower) back, neck or shoulders, these alternatives can help:
- Keep the arms and legs less high. It is not about getting it as far away from the mat as possible, it is about feeling how far your back can handle it and respecting that boundary.
- With a lot of tension on the (lower) back, neck and / or shoulders it can be nice to put the hands in front of you on the mat, put your hand together and let the forehead rest on the hands. And only keep the legs up.
- The legs are at hip width apart. An alternative to this can be to push them against each other, so you have more control and do the pose more easily.
Looking at this picture you might think “No, this pose can’t be good for me, I’m not flexible enough”. Logical, most people think that when they see the Plow pose. And yet everyone can do this pose when you gradually build up for it. The basis for this pose is in the preparatory poses. The warmer the body, the more flexible the muscles and joints, the easier the Plow is. In addition, there are all kinds of variations that allow you to do the Plow with more ease (and fun). These tips will help you.
What is the Plow posture?
This is a basic pose; an inverted supine position and forward bend. In yoga jargon this pose is called “Halasana”. Hala means “Plow”. There are many variations in this asana, although some may be pretty risky. The starting point is always doing what feels right; respect the body and the limits it indicates. In this pose, the (lower) back muscles, hamstrings, calf muscles, scholar muscle (just above the ankle), the triceps and the monk’s cap muscle (shoulder muscle) are stretched intensively. Stretching of the body is good because it brings back the natural length and suppleness of the body and the bloodstream and metabolism are stimulated. In the picture I have entwined my hands and stretched arms. Alternatively, the arms can also be stretched with the palms of the hands flat on the ground. When the toes do not touch the ground and the pressure on the lower back feels too much, it is best to put the hands on the lower back with elbows on the ground for support.
What is the effect of the Plow?
Halasana is a good pose to increase flexibility in the back muscles and hamstrings. In addition, it also has a positive effect on the muscles in your neck and shoulders and ensure that any tension that is there is reduced. The biggest challenge in this asana is being able to breathe freely. As a result of the reverse over bend, more pressure is placed on the diaphragm and organs, which reduces the freedom to breathe deeper. It is a matter of feeling how far you can bring your feet back to breathe freely. The goal is not that your toes touch the ground, that comes naturally with time. The focus is on the back and on breathing freely. To be able to do the Plow a good warm-up is required. That is why you will encounter this pose in a yoga class half way or towards the end of the class.
These tips help to do the Plow with more ease:
Tip 1 Preparation
Good preparation is important. Doing sun salutations several times makes the body, muscles and joints ready for this posture. Do at least 10 sun salutations when you do not do any other preparation poses. In yoga jargon we never say that we ‘do an pose’ but say we ‘come into the posture’. To get into the Plow, the (supporting) Shoulder stand and Bridge are nice preparation poses, where the second one gives the most challenge.
Tip 2 From the Shoulder position
If your toes do not touch the ground in the Plow, the Shoulder pose is the best position to start from. In this asana you have your hands on the lower back for support. On the exhale the toes point towards the face and the legs go straight and slowly forward. Try to keep the back straight as long as possible and first focus on the hamstrings. When you feel that you have reached your max, you hold your pose there. Remain a number of breaths in the pose. When the feet do touch the ground, gently stretch out the arms and place the palms on the floor. Feel the difference. If it feels comfortable, bring your hands together, intertwine the fingers and stretch the arms as far as possible while resting your hands on the floor. Bring the chin towards the chest to decrease pressure in the neck.
Tip 3 From the Bridge
In Halasana coming from the Bridge is more challenging and requires more of your arm muscles, especially the triceps. When you are in Bridge, the arms are stretched, fingers intertwined and the hands rest on the floor. You bring your body weight on one leg, for example the left. At the inhalation you stretch the right leg up and let it fall backwards, at the same time you push your arms against the ground. When the right toes are on the ground, let the left leg follows. Now also bring the chin to the chest to decrease pressure in the neck.
Actually, this yoga pose is not difficult to do, but it is difficult to perform well and to keep it going. In order to get and maintain the body in a straight line, concentration and control of breathing is necessary. Very easily you can stretch too far, or keep the hips too high or too low, reducing the effect of this pose. These tips will help you do the sideways plank correctly and with more ease.
What is the sideways plank?
This is a basic posture: a balance exercise on one arm. In yoga jargon this pose is called “Vasisthasana”. Vasistha means a sage; the best; the richest, the excellent. This asana is also called the ‘Attitude of the wise Visistha’. The biggest challenge in this pose is gravity, mental focus and maintaining a neutral axis of the spine. Due to the lateral posture, the muscles work against gravity. This requires effort from muscles and joints to stay in position.
What are the effects of the sideways plank?
This asana is an active basic posture and requires not only concentration of breathing, but also effort of the arms, stomach, chest, back, shoulder and leg muscles, and also of the hip and wrist joints and the vertebral column. In order to remain stable, the effort of many muscle groups is necessary and proper breathing is required. Good breathing (quietly breathing towards the belly) helps to maintain the pose for longer and is only possible when the body is and stays in a straight line. All muscles mentioned are trained in this pose which makes them stronger and gives an improved body posture and increases the overall condition.
This is how you do the sideways plank
Vasisthasana can be done by starting from the ‘standard plank’ pose. The weight is on two arms, fingers spread on the mat, and the legs on hip width apart. You then let the heels fall from the foot to the left, so that the sides of the feet are on the mat. When you do this, all the weight automatically will shift to the left arm. Make sure that you do not ‘hang’ in your shoulder, but stretch the arm well and keep the shoulder away from the ear. On a next inhalation, raise your right arm and on the exhale you extend this arm upwards. You make a straight line with the whole body and hold this pose by breathing at ease. Then you bring the right foot on the left foot and push the legs together. To get a straight line, push the tailbone towards the feet so that you automatically bring the hips forward. Stay in the pose for a number of breaths before you change sides. First back in the standard plank pose and then you shift the weight on the right arm.
When the wrists and/or lower back are soft spots these alternatives can help you do the sideways plank with more ease:
Alternative for the wrists
Instead of putting the hand flat on the mat, you make a fist. This takes the pressure off the wrist.
Alternative for the back
When two legs on top of each other doesn’t feel good, you can keep the feet apart and place them on the mat. Or if you have the weight on the left arm, place the left knee on the mat. By doing this, the pressure on the (lower) back reduces.
When you practice this asana for the first time, the muscles can start to vibrate. That is a sign of effort. Concentrate on breathing to maintain in this pose and relax the muscles.
You often see this gesture on photos with yoga poses; hands together and in front of the chest. This gesture is also used at the end of each yoga class to conclude it. But what does it mean, where does it come from and how do you do it exactly? In this blog I will explain more about the hand gesture ‘Namasté’.
What is Namasté?
The word Namasté originally comes from the Sanskrit language and stands for bending. Sanskrit is an Indo-Aryan language and the literary and sacred language of, among others, Buddhism and Hinduism. It is the language of the great classical literature of the Indian subcontinent. A number of Brahmin families (priest families) and certain Hindu sects still use it. It is not a vernacular but a cultural language that always belongs to a certain social elite. Sanskrit strongly influenced the languages of northern India, the country where yoga comes from. Namasté is a common gesture in India to greet each other and show respect.
What is the effect of Namasté?
In this hand gesture, also called “hand mudra”, the left hand represents the moon and the right hand represents the sun. At the same time, the left hand is the giving hand and the right hand is the receiving hand. Each finger represents one of the five elements. In addition, each finger tip symbolizes something else:
Fingers
- thumb represents emptiness;
- index finger represents air;
- middle finger represents fire;
- ring finger represents water and;
- little finger represents earth.
Fingertips
- thumb represents the insight;
- index finger represents activity;
- middle finger represents the observation;
- ring finger represents receptivity and;
- the little finger represents the form.
In yoga, this hand mudra has a symbolic meaning of “I bow to the Goddess in you”. It symbolizes respect “The soul in me, salute the soul in you”. The word ‘Namasté’ does not necessarily have to be pronounced when performing this hand gesture.
That’s how you do Namasté
Bring the hands together where the palms touch each other, place the thumbs against the sternum. The fingers point upwards and the head is slightly bent. Keep the shoulders low, away from the ears. When the yoga trainer says ‘Namasté’, it is an option to bend slightly forward and also say Namasté. But it can also be done without words, the meaning remains the same.
When you can’t do push-ups, the Cobra is a good yoga pose to build strength in the arm muscles. In addition to the arm muscles, the back muscles, large buttock muscles and hamstrings are also trained in this pose. In this blog I’ll share more about the effects of the Cobra.
What is the Cobra?
This is a basic posture: bending backwards from a prone position. In yoga jargon this posture is called “Bhujangasana”. Bhujanga means snake. Bhuja stands for arm or shoulder and ang stands for limb. In the Cobra the focus is on the spine, arms and legs. Many think that the legs are passive in this position but especially the hamstrings can be active just like the big gluteal muscle.
What is the effect of the Cobra?
By raising the upper body, the entire group of the dorsal back muscles and the abdominal muscles are active. This movement ensures that these muscles get stronger, which reduces, among other things, low back pain. The triceps, biceps and large and small pectoral muscles in the arms are especially trained. By regularly doing the Cobra, strength in the arms increases. Because the upper body goes up, the hamstrings automatically stretch. When they feel stiff or aren’t trained, the Cobra can be a challenge for the leg muscles. The big buttock muscle will automatically activate when this pose is a challenge for the hamstrings to help the body to stay in position.
That’s how you do the Cobra
Lie on your stomach and place your forehead on the mat. The hands come under the shoulders and the arms against the body. At an inhalation the hands push the body upwards, the arms stay slightly bent and against the body. The chest is pushed forward and chin up. Because the upper body goes up, the glutes and hamstrings tighten. Use this tension by pushing the hips towards the ground and thereby increasing the intensity of the asana. Although it is customary to raise the body on the inhalation, it can sometimes feel better to do this on the exhale. This depends on the breathing at that moment whether it is high (at the chest) or low (at the abdomen). Do what feels most comfortable for you to get the most out of this pose.
Alternatives
Does it hurt your (lower) back, shoulder or arms? These alternatives help you to do the Cobra with more ease.
(lower) Back
How higher the upper body is pushed up, the more pressure comes on the (lower) back and on the back muscles. The goal is not to bring the upper body as high as possible but at a height that feels good to you. Strength increases automatically and so does the ease of doing this pose.
Shoulders
With stiff shoulder and / or neck muscles, it may be nice not to put the hands under the shoulders but further apart or slightly forward. It can certainly help to pull the shoulder blades together to remove tension at the shoulders and neck.
Arms (and wrists)
In this position, the arms remain close to the body. When that doesn’t feel good, it is fine to have the elbows pointing outwards, which reduces the pressure on the arm muscles. If the wrists are sensitive, it can help to make fists with the hands and rest on them.
When you practice this pose for the first time, the muscles can (slightly) tremble. That is a sign of effort. Concentrate on your breathing to hold on to this pose and build up strength in the arms.
Yoga. Why didn’t I start this practice sooner?
I can’t blame myself that I did not, because I wasn’t ready for it. Too confronting, because yoga teaches us to be conscious. Being conscious about your body and mind. And that was just something I tried to avoid. Because if you keep going your mental garbage will not come to the surface. And I bet that I am not the only one who lives or lived like this. It’s a bit of a Western disease. Working hard, staying busy, running around and a lot of stimuli everywhere. But where does that bring us? Right, in disbalance. Disbalance that will take its toll eventually.
Yin en Yang
Movement is Yang. We practice a lot of Yang. Yang is good and is allowed to be present. But, we use it, and get exposed to it, way too much. Being busy is seen as successful. And we also abuse being busy to not address, for example, our pain or fear.
Yin is peace. Yin and Yang belong together. They should be in balance. Unfortunately, by being busy all the time, we became a little scared of Yin. Scared of the feeling it can evoke, like for example, boredom, guilt and pain that is present but not given any attention before now. But the more you will pay attention to Yin, the more you will notice other feelings. Feelings like peace, joy about giving care to your body and mind, relaxation and happiness.
Crying during class
Now that I started practicing Pilates and Yoga more and more, you can sometimes catch me crying during or after class. Usually it’s from feeling happy. Happy I cared for myself. In peace and relaxation. I consciously felt my body and that is the nicest thing. It is so important to align body and mind every once in a while. To let thoughts float by and just feel. To be okay with everything that is.
Another reason I sometimes cry is because in this way I notice that I, way too often, lose myself. That I don’t do what I actually feel or want. I double-cross myself too often, when I do not like myself or when I think I am not able or worthy enough. In these moments I quit before I actually start. I flee for things and situations. In taking time for yourself, you also notice these things.
Yin Yoga
Yin Yoga teaches you to feel and to let go. To go along with what is. Even when it’s uncomfortable. In class you try to maintain a certain position for a longer period of time. A position that can hurt, because you are stretching certain muscles quite a bit. The position is often uncomfortable and it will stay that way in the first stage. And that’s when your head tries to mingle in. You want to quit. You will think you can’t do it, and that it is not normal to feel this uncomfortable. When you start to fight the feeling your body gives you, you will lose. When you remain calm and let things be, something will change. And that’s where Yin starts. Breathe. Know that you are okay. Believe in yourself and in the healing process.
Then, suddenly, far away, you hear a voice: “You can slowly come back to sitting position”. Already? I felt wonderful and at peace. And there you go! You did it! You stopped fighting, you let go.
Something that can help me
I really feel that I have found something that can help me. I want to practice this, I want to do this. Because wouldn’t it be nice if I can better help myself through an emotional crisis. That I can get through it with more peace, because I believe that this uncomfortable state will pass. Letting go of the fight, because I believe in the healing process, in balance. That I will be okay with what is, till peace is restored. Till there is once again space for Yang.
X Bouwke
If you look at the photo, you might think that you are going to break your neck in this yoga pose. But nothing is further from the truth: everyone can do the Headstand. And when you do this asana regularly, it offers many health benefits. Scientific research shows that doing a reversed posture such as the Headstand increases brain activity by 14%. Just like the ability to concentrate better and in addition, it slows down the aging process. But how exactly does that work? In this blog post I will explain the effects of the Headstand and I will include a step-by-step guide on how you can do this pose with ease.
What is the Headstand?
This is a pose for advanced students: a reversed posture with arm support. In yoga jargon this pose is called “Salamba Shirshasana”. Shirshasana stands for ‘head’ and Salamba for ‘support by arm’. Often this asana is only called Shirshasana. In order to raise the body, the buttocks, thigh-, arm- and abdominal muscles are particularly active. Falling over can definitely happen in this pose. When doing this pose, make sure you do it on a soft surface or a wall to which you can rest against.
What are the effects of the Headstand?
This asana has many advantages when you do it regularly. Because the body is reversed, the blood pressure in your head, neck, shoulders, veins, blood vessels, lungs and legs also changes. The muscles and tissues in the body are activated to be able to stay in the posture. There is more oxygen in your head, which causes 14% more brain activity. This improves focus and prevents depression and anxiety. In addition, a reversed pose has a positive effect on the aging process of the body. It improves the overall body posture and especially strengthens the muscles in the back, shoulders, arms and abdomen. The Headstand also has a positive effect on the immune system and naturally enhances digestion. In short, this asana had a long list of health benefits.
This is how you do the Headstand
It is best to start from the Child pose. Remain a few breaths in this asana, until the body feels completely relaxed. Then put your hands on the mat and place the top of the head on the mat. It is important to place the hands well at a 90 degree angle where the fingers point towards the face and the fingers are spread for more grip. Stretch the legs and place the toes onto the mat. When you do this, there is automatically more pressure on the head and neck. Give yourself a few breaths to get used to this feeling. When you are ready, bring the knees to the chest one by one and the feet come off the ground. Stay in this position for a moment, check your breathing and then stretch out the legs at ease. Tighten the abdominal and buttocks muscles to remain more stable.
Alternatives
When the abdominal muscles are not trained enough, it can be difficult to bring the knees towards the chest. Alternatively, you can first let the knees rest on the forearms one by one. Left knee on left forearm, right knee on right forearm. Only when it feels stable and you have your breathing under control, you can first stretch one leg and then the next leg. When the Child Posture does not feel comfortable to do, an alternative is somersaulting before doing the Headstand.
The most important thing in the Headstand is doing what feels good for your body. Respect the limits that the body indicates and do not go over it. And as for so many things: if you practice regularly, it’s will get easier every single time.
Some have the impression that incense is a ‘drowsy state’ and gives spiritual enlightenment. But that is not the purpose of incense at all. It effectively contributes to your yoga class and daily life. How to use incense effectively? In this blog all the ins and outs.
What is incense?
The original meaning of the word incense is “incendere” which means “to burn” in Latin.
Where does incense come from?
Incense is made in India, Nepal, China, Japan and Tibet in particular and was originally an incense sacrifice intended to favor gods. It has been used since 1700 BC. In addition to an incense offering, it also had a very practical purpose in earlier times; the expulsion of rotting air. The animals that were sacrificed spread an odor that got masked with incense.
From 1960, incense came to Europe. In that period the interest in Eastern cultures and religion grew. Countries like China, India, Japan and Tibet use a lot of incense. In these countries incense is as common as flowers or the use of soap or perfume in the Western world. With the interest in these cultures also the import and use of oriental incense grew in the Western world.
What’s in incense?
Incense is one of the few substances that has all five elements in it.
- Earth (the ingredients used);
- Air (diffusion of the smell);
- Fire (is needed to burn incense);
- Water (one of the ingredients to make it) and;
- Ether (it has an ethereal action).
What is the effect of incense?
The smell of incense is perceived through your nose and stimulates your nerves. The nerves send a signal to the brain and decide whether a smell is pleasant or not. Smelling ensures that you pay attention. It improves concentration and relaxation. That is why incense is used during a yoga class. For example with the yoga posture Savasana. The use of incense can help doing this pose with more ease. The most used scents for incense are cedar, musk, white lotus and the scent of autumn leaves.
The summer is in full swing and who doesn’t want well-shaped buttocks in his or her beach outfit? The most effective way to do that is to practice yoga regularly. Yoga has been scientifically proven to be the most effective sport to train the body! It makes muscles stronger, more flexible and improves overall body posture. In this blog more about the yoga posture the Tabletop (also called Table) that provides well-shaped buttocks. Regularly doing this asana has a positive effect on the muscles of the buttocks.
What is the Table pose?
This is a starting pose; backward bend with arm support. In yoga jargon this pose is called “Chatus pada pitham”. Chartus stands for four, Pada for foot and Pitham for bench, seat or chair. The focus in this asana are the legs, arms and torso. To bring the body up, the buttocks, thigh muscles and hamstrings are active.
What is the effect of the Table?
By raising the body and keeping the shoulders and knees at the same height, the muscles in the legs, arms and corse are immediately activated. The triceps ensure that the arms can support the body weight. Just like the buttocks, thigh muscles and hamstrings. In order to stay in this position for a few breaths, the back muscles jump in, so these muscles will also get trained. In order to keep the shoulders and knees at the same height, the buttocks must be tightened. As soon as they tighten, the knees tend to pull together and the hips are lowered towards the ground. The challenge is to keep the knees about hip width apart, without lowering the hips. This requires an active effort of the hamstrings
This is how you do the Table pose
Sit down on the mat and put your feet hip width apart in front of you. The arms go backwards and the fingers point to the body. Make sure that the arms are behind your back, your chest is automatically a little forward when the arms are placed behind the back. There is approximately a hand-length distance between the fingers and the body. At an inhalation you raise the hips and the shoulders and knees at the same height. Arms are stretched and the shoulder blades are pushed towards each other. Let the head hang backwards. Tighten the glutes, keep knees at hip width apart and breathe easy. Stay in the posture for a few breaths.
Alternatives
Are the (lower) back, wrists or hamstrings sensitive areas for you? These alternatives help you to do the Table pose with more ease.
(lower) Back
In case of a sensitive lower back, it is nice to have a good warming-up by, for example, the cross-legged sitting or the cat posture before you do the Table asana. By tilting the pelvis, the pressure on the lower back is reduced; pull the navel inwards and push the tailbone towards the feet.
Wrists
When it does not feel comfortable with the wrists, it can help to make two fists and to rest on them instead of the hands.
Hamstrings
With stiff hamstrings it is nice to stretch these first before you do the Table posture. The Plow is a good asana to prepare the hamstrings. Listen to the limits that your body indicates. When the pressure feels too high for the hamstrings to hold the straight line between the shoulders and knees in the Table asana, keep the buttocks a little lower; this will immediately reduce the pressure on the hamstrings. By practicing the Table regularly, the body comes a little further up each time and you will get that bootylicious booty.