The back muscles are one of the largest muscle groups the body has. The training of this muscle group provides a better posture and prevents injuries in the back, neck and shoulders. The Cat pose increases the flexibility and suppleness in the back and the best thing is that everyone can do this pose!
What is the Cat pose?
This is a basic pose; a balance exercise on hands and knees. In yoga jargon this pose is called “Utthita Chakravakasana”. Utthita means stretch and Chakravakasana stands for cat. This asana is also called the ‘cat-cow pose’. Because the breathing the back is first made into a ball (cat) and then hollowed (cow). And this is also where the power lies in this asana. By moving rhythmically on the breathing in and out, this pose is done best and able to train the body.
What is the effect of the Cat/Cow pose?
This asana increases the flexibility and suppleness of the back, also stretches the muscles in the arms and legs, and makes the hips and abdominal muscles stronger. It is an active basic asana that is done on the breath. By making the back convex and then hollowing, you emphasize the natural curvature of the spine and, in particular, relieve any tension in the lower back, shoulders and neck. It is important to breathe in and out through the nose. A hurried breathing creates tension in the body and has a counter-effect.
This is how you do the cat / cow attitude
- Sit on your hands and knees. Important is that the knees are at hip width, arms are stretched and the hands under the shoulders, fingers spread for a better balance. In case of sensitive or painful wrists you can alternatively make two fists and rest on them.
- The shoulders are pushed backwards, away from the ears, which directly reduces strain on the neck and shoulders.
- In the starting position the back is straight and you look at the ground.
- The toes are stretched or if that feels more comfortable, place the toes in the ground.
- At the inhalation you push the chin towards the chest and you arch the back. Here you stretch the arms and push the weight with your hands (or fists) away from you.
- On the exhale push the chin towards the ceiling and make the back hollow and push the shoulder blades towards each other, as in the picture above.
- Repeat this least four times or more when you have sat a lot in one day.
Do you want to train your back more after doing the Cat pose? This video will help you
This posture looks very easy but can certainly be a challenge when there is stiffness in the muscles. In order to get into this pose, many muscles need to extend. It can be difficult to breathe properly and this asana can be a big challenge. These tips help you to do the Child’s Pose with more ease!
What is the Child’s Pose?
This is basic pose: kneeling forward. In yoga jargon this pose is called “Balasana”. Bala means ‘young, childlike, not yet fully grown’. Due to the forward deflection gravity forces the body deeper into the posture. The challenge in this asana is to put the forehead on the floor and the sitting bones towards the heels. Because the chest rests on the upper legs, the movement of the breath towards the abdomen and the front part of the rib cage is limited. When the back is smooth, it can expand more on the inhalation and there is less pressure on the chest and an optimal stretch of the entire spine.
What is the effect of the Child’s Pose?
The entire spinal column and in particular the dorsal back muscles are strengthened just like the hamstrings. The large but muscle and calf muscle are also lengthened and the toe joints loosened. When there is stiffness in the hip joint and lower back, it can be a challenge to breathe freely in this pose. To experience relaxation, the goal is to make the back as arched as possible on the inhalation so that breathing is easier.
This is how you do the Child’s Pose
Sit on hands and knees and place the forehead on the floor. Extend the arms backwards along the body, hands towards the feet. Let the chest rest on the top legs and push the sitting bones towards the heels. On the inhalation the back arches with the sit bones resting on the heels.
Alternatives
When the lower back or hips feel stiff, the following alternatives can help:
- Place a cushion on your ankles and let the sitting bones rest on it.
- Place a cushion on the floor to place the head there when it does not touch the ground.
- As an intermediate step it can be nice to place the hands on the ground at the height of the shoulders for support.
The more relaxing the breathing goes, the more the muscles and joints relax and the easier the pose.
That yoga is good for you is proven by many scientific studies. It not only improves the overall body posture, it also ensures a good night’s sleep. But sometimes it is a challenge to sleep well when we are so busy. Therefore, in this blog an overview of yoga exercises that help you get a better night’s sleep.
Relax the shoulder, neck and back
Unnoticed during the day, tension builds up in the shoulders, neck and back. Especially with office work. Cramped muscles make it difficult to sleep well. Release that tension with this exercises routine
Sun Salutation
The Sun Salutation is an ideal exercise as a warming up for all muscles, tendons and joints. Starting your day with the sun salutation helps you to guard your focus. At the end of the day this is a nice way to relax the body so you can get to sleep with more ease. 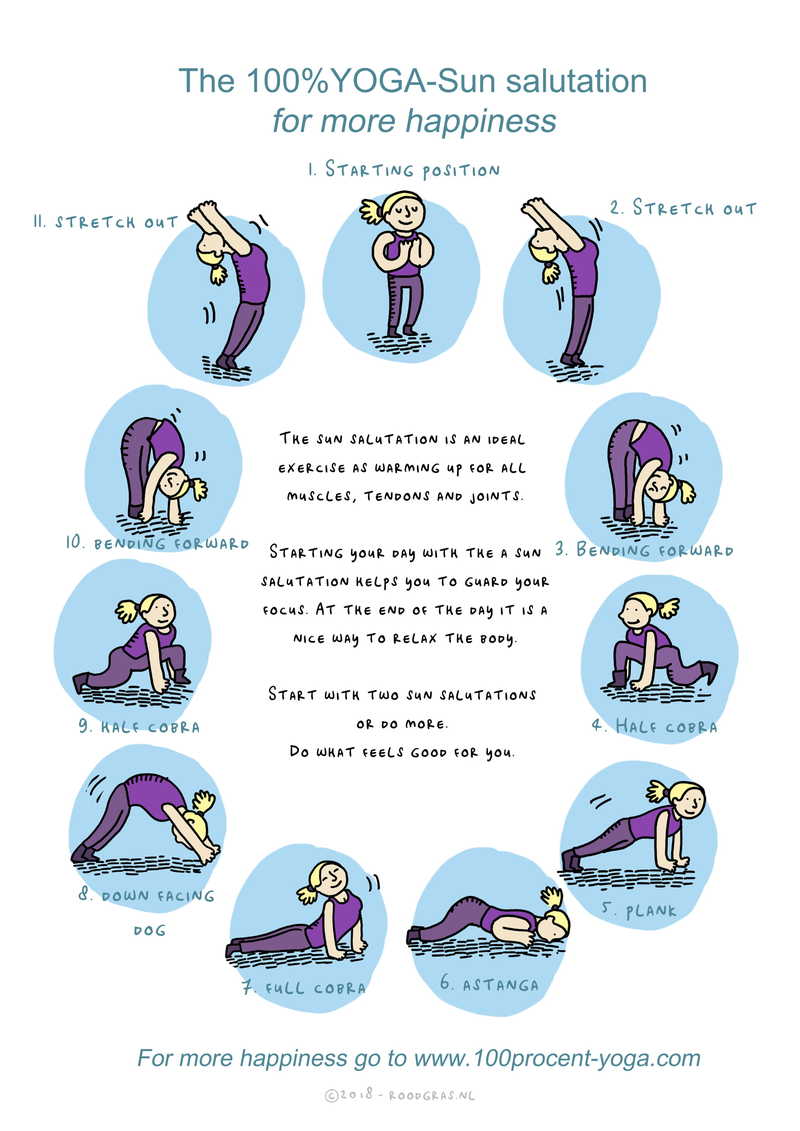
Relaxation exercise
Just empty the head completely and think of nothing. It is often easier said than done. This exercise helps clear the head and provide a deep and relaxed sleep. Find a quiet place or lie down on your bed or couch, close your eyes and listen to this relaxation exercise.
Savasana
This yoga exercise is said to be the easiest to perform, but the most difficult is to fully master. Other yoga posture requires an (active) effort of muscles, tendons and joints. Savasana is also called the “Corpse pose” and the starting point is to release all tension completely in every part of the body and make the head completely empty of all thoughts. This makes Savasana the most challenging pose for every yogi. By practicing Savasana regularly you promote a good night’s sleep.
Music
Music has been known for some time that it can be relaxing for the human body. Scientists from Mindlab in the United Kingdom did research and came to a surprising discovery. The music track ‘Weightless’ by Marconi Union has a great relaxing effect. The secret of the number? “It has a rhythm that starts at 60 beats per minute and slowly slows down to 50 beats per minute,” said Lyz Cooper of the British Academy of Sound Therapy. “While you’re listening, your heartbeat slows down until it’s right with that beat. This in turn leads to a reduction in blood pressure. Because there is no repetitive melody in it, your brain can turn off completely, because they do not try to predict what will happen next. “Listening to this song before going to sleep will ensure a relaxed night’s sleep. Listen to the song here and experience the peace.
If you look at the picture, you may wonder what the challenge of this pose is. This posture is called the Corpse Asana and is a supine pose; a pose where you lie on your back with your face towards the ceiling. De Corpse Asana is the prototype for a supinating pose. The entire back of the body forms the support surface so that all muscles can relax. But what is the challenge in that?
What is the Corpse pose?
This is a basic posture lying on the back. In yoga jargon this asana is called “Savasana”. Sava means corpse, which is why this asana is called the Corpse-pose. The biggest challenge in this pose is gravity and mental focus. This asana is said to be the easiest posture to implement but the most difficult to fully control. Other yoga poses require an (active) effort of muscles, tendons and joints. In the Corpse pose, the starting point is to let go of tension in every part of the body and to clear the mind. This makes Savasana the most challenging asana for every yogi.
What is the effect of the Corpse pose?
Savasana has the lowest center of gravity and is the starting position of all abdominal poses. It’s also the pose in which an asana ends. In order to move in a position from the supine position, musculature of the front of the body is needed, and that is why many abdominal strengthening exercises start from this pose. The deep state of conscious relaxation that Savasana gives is even better than sleep. In Savasana the body is completely at rest and the metabolism is free of gravity, which makes it possible to practice difficult breathing exercises; being fully aware of your breathe.
For many people it’s difficult to completely relax. Many want to lay down symmetrically. However, every human body is naturally asymmetrical, a certain surrender is necessary to actually experience physical relaxation. To be able to fully relax requires acceptance that the body is as it is, rather than the way you want it to be. In addition, clearing your mind is a second big challenge. On average, we have 40,000 to 60,000 thoughts a day, to convert the mind and to stop ‘thinking’ is for many the most difficult part of this asana.
This is how you get into Savasana
You can do the Corpse pose by lying down on the floor. The legs and feet are slightly apart and the arms are a bit away from the body with the palms up. When your lower back is sensitive, an alternative is to keep the legs bent by putting the feet on the floor or placing a pillow underneath the knees. The hands can possibly be placed on the stomach to bring attention to natural breathing. Focus on your breath, this helps to clear the mind of thoughts. When we lie still, it is tempting to go back to the thoughts that go through our minds. By repeatedly turning back the attention to breathing and by breathing towards your hands, you manage to clear your mind and experience complete relaxation. These three tips will help you to do Savasana with more ease.
- Close your eyes to excluded the environment around you and you are more aware of the current moment.
- When you are just in Savasana it can help to sigh a number of times. By breathing deeply through the nose and exhaling through your mouth, the body relaxes.
- During this pose, music is often played to help to keep the focus on the breathe and clearing the mind of thoughts. Scientifically proven, the music track ‘Weightless’ by Marconi Union has a great relaxing effect. The secret of the number is the number of beats per minute. It has a rhythm that starts at 60 beats and slowly slows down to 50 beats per minute. As you listen, your heartbeat naturally slows down until it is has the same rhythm of the beat. That leads to a reduction in blood pressure. Because there is no repetitive melody, your brain can completely shut down, because it cannot predict what will follow next. Listen to the song here and experience the peace of mind it brings.
“Oh no, I cannot do that, I will break my neck.” That is often the first reaction when people see this yoga pose. Logically, as the Shoulder pose looks impressive. But this pose is one that everyone can do without breaking his or her neck. Perhaps surprising to hear; the strength for this pose is not in (strong) neck or arm muscles but in the shoulders in combination with a good breathing technique. And by doing preparatory exercises this pose can be done with reasonable ease. These tips will help you on your way.
What is the Shoulder pose?
This is a basic pose; an inverted supine position. In yoga jargon this pose is called “Salamba Sarvangasana”. Salamba means “with support”. Sarva stands for “all” and Anga means “limb”. To get into Schouder asana you start from the Bride or Plow pose. The starting point with every yoga pose is always doing what feels right; respect the body and the limits it indicates. In the Shoulder pose, especially the monkshaper muscle (shoulder muscle) and some deeper muscles attached to the cranial edge are stretched intensively. The triceps support the body to stay upright in this asana. If the stretching of the legs does not feel comfortable, it is an alternative to keep the legs less upright or the knees slightly bent.
What is the effect of the Shoulder pose?
Salamba Sarvangasana is a good posture to increase flexibility in the shoulder muscles. In addition, it also has a positive effect on the muscles in your neck and contributes to reducing any tension that may occur there. The biggest challenge in this asana is being able to breathe freely. By raising the legs, there is more pressure on the diaphragm and organs, which reduces the freedom to breathe deeper. It is a matter of feeling how far the legs can be raised to breathe freely. The goal is not to get the legs straight up. The focus is on the shoulders and breathing freely. To be able to do the Shoulder pose, a good warm-up is required. That is why this posture is done halfway or towards the end of the a yoga class. These tips help to do the Shoulder pose.
Step by step getting in Shoulder pose
- Preparation
Good preparation is important. Peforming the sun salutation several times makes the body, muscles and joints ready for this posture. Do the sun salutation at least 10 times when you don’t do any other preparation postures.In yoga jargon we never say that we ‘do a pose’. We ‘come into the pose’. To get into Shoulder asana the Plow and the Bridge are nice starting positions where the last one is most challenging. - From Plow into Shoulder pose
When you are in Plow and your toes reach over your head towards to flow, you place your hands on your back. Make sure that the elbows rest on the floor so that the arms can support the heaviness of the body. Then bring the legs up and against each other one at a time. Alternatively, both legs can be raised simultaneously. By choosing this option, more strength is demanded from the core muscles. Press the legs and feet together when they are raised and bring them to a height so that the pressure on the diaphragm is sufficient to breathe easily. - From Bridge into Shoulder pose
Coming from the Bridge into the Shoulder pose is more challenging and requires more of the arms and abdominal muscles. When you are in Bridge, the arms are stretched, fingers intertwined and the hands rest on the floor. Bring your body weight on one leg, for example the left. On the in-breath you raise the right leg and then bring the right knee towards the chest. The hands come apart and place the shoulders firmly on the ground, push the hips further up. Place the elbows on the floor and the hands on the lower back. The right leg slightly backwards towards the head; the right knee is now above the face. Then bring the left knee towards the chest. Then place the hands higher on the back and stretch the legs and feet one by one and push together. Bring the chin towards the chest to release tension from the neck. Alternatively, the legs can also be stretched simultaneously.
The cross-legged pose is a common posture which is called asana in official yoga jargon. But sitting in this posture for a while can sometimes be a challenge. You can get cramp or feel stiffness in your joints making you want to do something else than stay in this position. When I first started yoga, I could not do this asana. It felt like the blood supply in my legs was pinched and I even got sleeping feet (really annoying). Sitting upright was difficult because of my hollow back and instead of relaxing my shoulders, I pulled them up very high towards my ears. No, I did not like the cross-legged pose nor was it relaxing. I therefore looked for alternatives to make it easier and, even more important, to practice yoga with more joy to keep an healthy lifestyle. I have been practicing for a while and the cross-legged pose is a relaxed posture which I can do with ease. I did use alternatives to get there. With these tips I hope to increase your joy and help you do the cross-legged asana with more ease.
What is a cross-legged pose?
In almost every yoga class, the cross-legged asana occurs. The class can start or end with it and it may be used inbetween to make the transition to a different posture. The purpose of the cross-legged asana is to keep feet, ankles, knees, hip joint, pelvis, spine and skull flexible. The cross-legged pose is the most natural way of sitting for your body. When you practice this posture for a while you can increase your natural flexibility. But where does the cramp or stiffness come from?
How do you sit?
Many of us have a sedentary profession. Like shoes are for the feet, so is a chair or car seat for the lower back and pelvic joint. By sitting on a piece of furniture for a long time, your natural flexibility decreases. And what the effect is, you feel immediately in the cross-legged position. If you have been sitting for a long time, your muscles may feel stiff or your lower back even painful, which means that you will not be able sit cross-legged for long. How do you prevent that and how can you sit (more) relaxed in this asana?
Make sure that the (car) chair you use during work supports your body well and you regularly take a break by stretching your legs. That is really half the work! Did you know that there are 20 points that your workplace needs to meet if you want to be able to adopt a good body posture and be productive? One of those points is to regularly take a break and take a walk, for example during the lunch or get coffee / tea more often for your colleagues. You not only stimulate teamwork, but also the blood circulation in the body which keeps your muscles and joints more flexible making it possible to sit cross-legged with more ease.
The five phase of the cross-legged asana
There are five phases of the cross-legged pose; from a beginner’s posture to an advanced one. The more flexible your body, the greater the easier by going through the stages. Practicing regularly is important. Just as you can’t complete the marathon untrained, you can’t do the five phases of the cross-legged pose untrained.
- Starting pose; also called the easy pose. In yoga jargon this asana is called “sukhasana”. You sit on the floor with your legs crossed, hands resting on your knees.
- Basic sitting pose; When the starting position is easy, you can proceed to phase two or the “siddhasana”. Your legs are crossed and one foot is under your leg and the other foot folds between your upper leg and calf. Hands rest on your knees.
- Sitting pose for advanced: called “svastikasana” and also known as the “half lotus pose”. Both legs are crossed and one foot is placed on your thigh, the other foot you cross under your leg.
- Sitting pose for advanced: “padmasana” and also known as the lotus posture where you cross both legs and let both feet rest on the upper leg.
- Sitting pose for very advanced: “mulabandhasana” in this asana are the legs crossed, the soles of the feet pressed against each other and the feet turn the hip joint turned.
Alternatives
These alternatives helped me during the cross-legged asana. By using these alternatives you make this posture more comfortable for yourself and thus increase the effect. I started at phase one and progressed slowly to phase three. I can’t do the four or five. Maybe one day; it will come naturally. My principle is always doing that what feels right. Experience where your boundaries are and do not push yourself (too much). Take your time, listen carefully to your body and do not forget: everything you do more often, will become easier.
- Alternatively, you can stretch your legs when crossed legs does not feel nice.
- If you have a hollow back, push your tailbone towards the ground. This makes the back straight and relieve (painful) tension from the lower back.
- Push aside your buttocks and make sure you feel the sit bones. This helps you to sit up more straight. Sit on a pillow if that is more comfortable.
- Draw your belly inwards to your spine. As a result, you tilt the pelvis slightly and you can sit more relaxed.
- Let your chin slightly rest in the direction of your chest, push the tip of your tongue against the back of your front teeth and do not put your teeth together. This relaxes the jaw and neck.
- And breathe easy. If we exert ourselves, we tend to hold our breath. That will not help. Breathe gently towards your stomach, which will help your body relax making this asana feel (more) comfortable.
We are not all good at the same thing. Authenticity is what makes you unique, which I think we should accentuate, instead of comparing with the standards of others. For years I have thought that my body was weak.
The reason I do yoga has nothing to do with flexibility. This is #myyogastory.
At the age of six, a tumor had grown into my spine, which had to be surgically removed through the stomach to increase the chance of survival. The operation was successful, but brought complications; two scar corrections where necessary over a period of ten years. In total my core muscles have been cut through three times, which makes them less strong.
I was unsure about sharing my vulnerability, until I stood on the yoga mat.
On the mat
That is where I am happiest; free from physical, self-conceived or socially imposed restrictions. Yoga has taught me to accept my body and listen to it. By doing alternative exercises my body became stronger and at the same time my vulnerability developed into a strength.
Feeling this ‘freedom of possibility’ is my greatest treasure and the motivation behind my yoga company.
In our classes this renders by offering multiple alternatives for each posture. This means that everyone, regardless of age, from beginner to advanced, with or without physical or mental disabilities, can join the classes. Experiencing that you are capable of more than expected increases the feeling of happiness and that is why I am a yogi and yoga for me is the fundament of a healthier and happier lifestyle. It is the mission of 100%YOGA to convey the feeling of possibilities and to inspire you to be your unique, authentic self.
NiceDay
Every day on national level my team and I devote ourselves to bringing more vitality at companies, universities and private sector. It is fantastic how yoga makes the body flexible and stronger. How on busy days it brings peace of mind.
Every month I will share my personal tips and alternatives on how to do a single yoga exercise correctly and with more ease on the NiceDay blog, and also what the effect is of that exercise and how to use yoga in having a healthier and happier lifestyle. Looking for a specific tip? Let me know. I look forward in helping you.
Young, old, male, female, everybody seems to do yoga nowadays. Yes, everybody! And it seems so easy when they do it. Unlike how you feel when you drag yourself to yoga class. We give you some tips to enjoy your next yoga class.
Do not compare yourself
Of course, the people around you are doing ‘super well’, but keep in mind that they also started somewhere. In yoga it is important to focus on yourself. You will see that when you focus, you will understand the postures better. This will make you feel (more) comfortable about yourself, which will make you perform better!
Breathe in, breathe out
Your yoga teacher probably told you about a hundred times already, however we will tell you once again: focus on your breathing! I know, how can you breathe when you are all tangled up?! But you can. Your focus should be on your breathing, since a proper breathing will make yoga easier for you. Do you notice that you are starting to feel distracted, then do an easier pose until you gain control again. There is nothing wrong with that, yoga is all about keeping your own pace.
Let tools help you
You might have seen someone grabbing a yogablock or yogabelt during class. These tools will help you perform postures you do not know yet. Look at it as an extension of yourself, to give yourself some trust in performing an posture. These tools will provide support, which will make it easier for you to relax. And that will give you a better feeling when you are back on your yogamat!
Have fun!
This might sound logical, but have fun during class! Of course you will notice that others are doing better, others can reach their toes while you cannot. But keep this in mind: you do this for yourself! Do not take it too seriously: the more you practice, the better you will be. The most important thing is that you start and enjoy it.
Good luck and let us know how your class went! Do you have any tips? Share them in the comments!
Yoga is not about touching your toes. It is what you learn on the way down.